
Is your phone charging slowly, intermittently, or not at all? A dirty charging port is often the culprit behind these frustrating charging issues. Dust, lint, and other debris can accumulate in the charging port, obstructing the connection between your device and the charging cable. This can lead to reduced charging efficiency, overheating, and even damage to your device. In this step-by-step guide, we will show you how to clean your charging port effectively and safely, restoring optimal performance and prolonging the life of your device. Learn the proper techniques and tools to use for various device types, including smartphones, tablets, and other electronics with charging ports. Keeping your charging port clean is essential for maintaining the optimal performance of your devices.
Cleaning your charging port is a simple yet crucial maintenance task that can significantly impact your device’s charging performance. Neglecting this simple procedure can lead to a build-up of debris that interferes with the charging process, resulting in slow charging times, overheating, and potential damage to your device. This comprehensive guide provides clear and concise instructions on how to clean your charging port, ensuring a secure and efficient connection for optimal performance. By following these steps, you can prevent charging problems and extend the lifespan of your valuable electronics.
Why Cleaning Your Charging Port Matters
A clean charging port is crucial for the optimal performance and longevity of your electronic devices. Dust, lint, and other debris can accumulate in the port over time, creating a barrier that prevents a solid connection between your device and the charging cable.
This can lead to several common charging issues:
- Slow charging: The debris interferes with the flow of electricity, resulting in significantly longer charging times.
- Intermittent charging: Your device may charge sporadically, connecting and disconnecting repeatedly as the cable struggles to make proper contact.
- Inability to charge: In severe cases, the buildup can completely block the connection, preventing your device from charging altogether.
Regular cleaning can prevent these issues and ensure your device charges efficiently and reliably. It also helps protect your charging port from potential damage caused by forcing a connection through accumulated debris.
Gathering the Necessary Tools
Before you begin cleaning your charging port, it’s essential to gather the right tools. Using inappropriate tools can cause damage, so choose carefully. Here’s what you’ll need:
Primary Tools
- A soft-bristled brush: This is the most important tool. A small, anti-static brush, like those designed for cleaning camera lenses or electronics, is ideal. Avoid using brushes with metal bristles, as they can scratch and damage the delicate contacts within the port.
- A flashlight: A bright light source will help you see inside the charging port and identify any debris or obstructions.
Optional Tools
- Compressed air (canned air): Use short bursts of air to dislodge stubborn particles. Hold the can upright and keep a safe distance to avoid introducing moisture into the port.
- A toothpick (wooden or plastic): If a soft brush isn’t sufficient for removing a particularly stubborn piece of debris, a toothpick can be used with extreme caution. Avoid applying excessive force, which could damage the port.
Remember, the key is to use gentle tools and avoid any metal objects that could scratch or damage the charging port’s internal components.
Powering Off Your Device: A Crucial First Step
Before attempting any cleaning of your charging port, it is crucial to completely power off your device. This prevents potential electrical shorts and ensures your safety during the cleaning process. Failing to power down your device could lead to damage to the charging circuitry or even the device itself.
The procedure for powering off varies depending on the device. Most devices have a power button that you need to press and hold for a few seconds. Follow the manufacturer’s instructions specific to your device to ensure it is fully powered down. Do not simply put the device to sleep or activate a low-power mode. A complete power off is essential.
Once the device is powered off, you can safely proceed to the next step of the cleaning process.
Inspecting the Charging Port: Identifying Debris and Blockages
Before attempting any cleaning, carefully inspect the charging port. Good lighting is crucial for this step. Look for any visible obstructions. Common culprits include:
- Dust and lint: These often accumulate in the port and can interfere with the connection.
- Pocket debris: Small pieces of paper, fluff, or other materials from your pockets can easily become lodged in the port.
- Damaged pins: While less common, bent or broken pins within the port can prevent charging. If you suspect pin damage, consult a professional for repair.
Take note of the type and amount of debris present. This will help you determine the best cleaning method. Avoid inserting any tools into the port at this stage, as you could potentially cause damage. Simply observe and identify the blockages.
Using a Soft Brush: Gently Removing Dust and Lint
A soft-bristled brush is the primary tool for this cleaning process. Avoid using anything metal or sharp, as this could damage the delicate contacts within the port. An anti-static brush, commonly used for electronics cleaning, is ideal, but a clean, dry, unused toothbrush can also work effectively.
Gently insert the brush into the charging port. Avoid applying excessive force. Use small, circular motions to dislodge any dust, lint, or debris trapped inside. Pay attention to the sides and bottom of the port where debris tends to accumulate.
After a few rotations, carefully remove the brush and check for any dislodged particles. You may need to repeat this process several times to ensure thorough cleaning. Lightly tap the device or use a can of compressed air (holding it upright and at a safe distance) to remove any loosened debris that remains.
Compressed Air: Blowing Out Stubborn Particles
Compressed air is an effective initial step for cleaning your charging port. It can dislodge larger dust particles and debris without requiring physical contact with the delicate internal components. Always use a can of compressed air designed for electronics. These cans contain filtered air and often come with a thin nozzle, allowing for precise application.
Hold the can upright to prevent the propellant from entering the port. Position the nozzle a short distance away from the port, and use short bursts of air. Avoid prolonged blasts, which can potentially damage internal components.
Angle the nozzle slightly during each burst to target different areas within the port. This ensures a more comprehensive cleaning. After each burst, visually inspect the port to assess the effectiveness of the cleaning.
Isopropyl Alcohol and a Cotton Swab: A More Thorough Cleaning Method

If compressed air doesn’t fully clear the debris, isopropyl alcohol offers a more thorough cleaning solution. It’s crucial to use 90% or higher concentration isopropyl alcohol as lower concentrations contain water which can damage your device. Never use any other cleaning solutions.
Lightly moisten a cotton swab with the alcohol. Avoid soaking the swab as excess liquid can be harmful. Gently insert the swab into the charging port and carefully maneuver it to dislodge any remaining dirt or lint. Avoid applying excessive force which could damage the delicate connectors inside.
A toothpick can be a helpful tool for stubborn debris, but exercise extreme caution. Gently scrape around the interior walls of the port to loosen any stuck particles. Do not use metal objects as these can scratch and permanently damage the contacts.
Drying the Charging Port Completely: Preventing Damage
After cleaning your charging port with compressed air or isopropyl alcohol, ensuring it’s completely dry is crucial to prevent damage. Moisture can cause corrosion and interfere with charging functionality.
Allow the port to air dry for a minimum of 30 minutes. You can gently shake your device to dislodge any trapped droplets. Avoid using any external heat sources like hair dryers, as these can damage the delicate internal components of your device.
Before plugging in your charging cable, visually inspect the port to ensure no visible moisture remains. If you see any liquid, allow additional drying time.
Testing the Charging Port: Ensuring Proper Functionality
After carefully cleaning and thoroughly drying your charging port, the next crucial step is to test its functionality. This ensures the cleaning process was successful and that the port is working correctly. A faulty charging port can lead to slow charging, or even worse, prevent your device from charging altogether.
Begin by plugging your usual charging cable into the port. Observe if the device begins charging as expected. Look for on-screen charging indicators, such as a charging icon or a percentage display. If your device displays a charging indicator, allow it to charge for a few minutes to observe the charging speed. If the charging rate seems normal, this indicates the port is likely functioning correctly.
If your device does not register the charger, try a different charging cable and power adapter to rule out issues with the accessories themselves. If the device still fails to charge, despite using a different cable and adapter, further troubleshooting or professional repair might be necessary.
Preventing Future Buildup: Tips for Keeping Your Port Clean
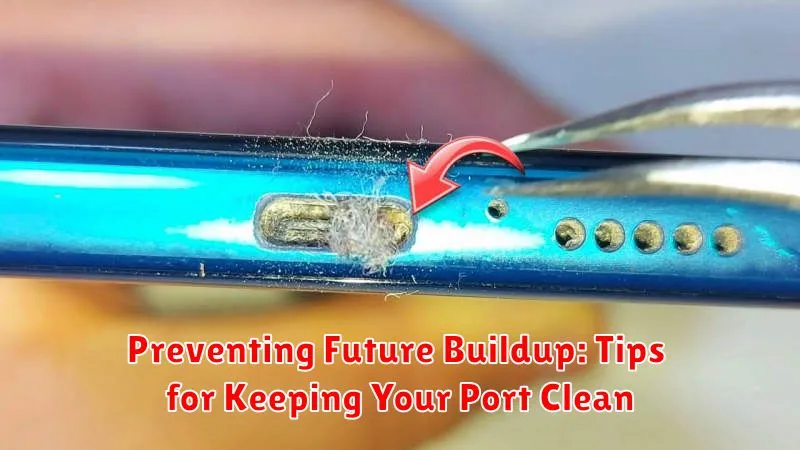
Regular maintenance is key to preventing future buildup in your charging port. By incorporating a few simple habits, you can significantly reduce the accumulation of dust, lint, and other debris.
Cover your port. When not in use, consider using a small dust plug or cover specifically designed for charging ports. This physical barrier prevents foreign particles from entering the port in the first place.
Keep your pockets and bags clean. Lint, dust, and small debris often accumulate in pockets and bags. Regularly cleaning these will minimize the transfer of particles to your device’s charging port.
Avoid charging in dusty environments. If possible, refrain from charging your device in excessively dusty areas like workshops or construction sites. These environments significantly increase the risk of debris entering the charging port.
Regularly inspect your port. Periodically examine your charging port for any signs of buildup. Early detection allows for prompt cleaning and prevents more stubborn accumulations from forming.